Ada website yang memanfaatkan kedua search engine tersebut untuk pencarian secara sekaligus, yaitu Twingine yang beralamat di twingine.com. Lalu...
Ini logo websitenya, cool ....

Contoh hasilnya ini....

Browsing pun jadi lebih enjoy dengan materi sama tetapi sumber berbeda ...

Semoga menjadi pengalaman yang berarti ...
Labels: Pengalaman
IMAP untuk Gmail
Dengan bangga, tim Gmail mengumumkan peluncuran dukungan IMAP untuk Gmail yang membuat Anda dapat menggunakan email Google Apps di kantor, mobil, atau di manapun dengan perangkat apapun, agar dapat menjaga sinkronisasi informasi di semua perangkat sehingga yang Anda lakukan di satu tempat dapat ditampilkan di tempat lain saat Anda mengakses email. Berbeda dari penggunaan POP yang tidak dapat mensinkronisasi perubahan yang dilakukan di perangkat lain dengan email online, Anda dapat mengkonfigurasi IMAP untuk account Anda dan menikmati pengalaman yang disempurnakan. Kami berupaya keras untuk menyediakan IMAP bagi pengguna Gmail di seluruh dunia. Jika bahasa Anda telah tersedia di IMAP, Anda dapat melihatnya pada tab “Pengaturan” dalam account email Google Apps.
Setting di gmail[dot]com :

Asalnya memakai POP Server, coba dirubah untuk memperoleh Sebuah Arti Harapan (SAH) :

Hati-hati, kalau untuk Thurderbird di IGN 2007 (Linux OS) port untuk imap server di 993 (SSL).

Aplikasi di gmail[dot]com :
1. Google Documents untuk Mobile
2. Pembaruan fitur spreadsheet
3. Fitur baru untuk Edisi Premier dan Pendidikan
* Manajemen kebijakan dan pemulihan pesan oleh Postini (Edisi Premier)
* Kapasitas penyimpanan Gmail yang lebih besar (Edisi Premier dan Pendidikan)
* Routing email (Edisi Premier dan Pendidikan)
Untuk daftar lebih lengkap tentang fitur yang diluncurkan dalam beberapa minggu terakhir, kunjungi halaman fitur baru.
Google Apps: http://www.google.com/a
Labels: Pengalaman

ZOIPER Free Version 2.0 is a new generation SIP and IAX softphone compatible with the Asterisk platform as any other SIP or IAX capable system. ZOIPER Free Edition features include:
* SIP + IAX/IAX 2 protocols
* STUN support
* STUN server per account
* Echo cancellation
* DTMF tones sending
* Support for multiple audio devices
* Automatic user registration
* Call transfer
* Hold function
* Codecs: GSM, ulaw, alaw, speex, ilbc
* Adaptive Jitter Buffer
* Call history
* Address book
* Quick dial panel
* Optional Automatic pop-up window for incoming call
* Always on top
* Call logs
* Voice mail message information
* Account password encryption
* Upgrade notification
* Adjustment of audio device
* Codecs priority
* Portable storage compatibility
* Multilanguage support

ZOIPER can also be re-branded. You can choose one of the three types of re-branding:
* Basic: colours, name and logo to your choice;
* Re-branding with additional development: e.g. changing the language; adding, disabling, removing menus, options, buttons; adding functionalities;
* Complete: you can go for complete change of the interface and functionality.
Details about ZOIPER OEM can be obtained at zoiper@asteriskguru.com.
ZOIPER BIZ, the advanced version of ZOIPER Free, gives more features:
* SIP + IAX protocols
* Native conferencing
* API
* G729 (optionally)
* STUN support
* STUN server per account
* Mail program plug-in: Outlook integration
* Callto URL protocol
* Automatic provisioning (XML)
* Call forward
* Auto answer
* Incoming URL handling
* Automatic opening of incoming URL
* Access voice mail message with one button
* Codec settings per account
* Attended transfer (native)
* Call recording (Single file recordings)
* Command line dialing
* Custom ring tones
* TCP/TLS transport with SIP
* Open URL on call answer
* Call history
* Call transfer
* Unlimited number of accounts
* Changeable number of lines (up to 6)
* More!
Click here to download ZoIPer!
Labels: Pengalaman
virus, selain menggunakan engine-nya sendiri,juga dapat dipadukan
dengan ClamAV. Kombinasi yang dihasilkan dari keduanya sungguh
dahsyat untuk mendeteksi virus komputer.
ClamAV (www.clamav.net) merupakan program antivirus opensource
untuk Unix yang berlisensi GPL. Penggunaan double engine ini
bertujuan agar hasil pendeteksian virus bisa didapat lebih banyak
lagi. Database dari ClamAV sendiri saat ini mencapai 90.000 virus
lebih. Tentu saja konsekuensi logis dari besarnya database virus ini
adalah lebih lamanya proses pendeteksian dibanding tanpa engine
ClamAV, tapi tentu hasilnya pun lebih meyakinkan.
Berikut ini Gambarannya :


Sekarang mendeteksi lebih banyak ..... ;-)
Untuk itu dibutuhkan sebuah file library (libpclamav.dll) dan dua
file database virus (main.cvd dan daily.cvd) yang nantinya
diletakkan di dalam folder yang sama dengan folder PCMAV berada.
Untuk lebih jelasnya, dalam mengintegrasikan ClamAV ini ke dalam
PCMAV, berikut urutan langkah-langkahnya:
1. Prosedur penginstalan library ClamAV
A. Download file "TClamav.0.1.1.zip" dari alamat berikut:
http://downloads.sourceforge.net/visualsynapse/
TClamav.0.1.1.zip
B. Setelah Anda mendapatkan file "TClamav.0.1.1.zip" hasil
download tadi, lakukan ekstrak terhadap TClamav.0.1.1.zip
*HANYA* pada file "libpclamav.dll" (tanpa perlu mengikutkan
file lainnya maupun folder "LIB") ke dalam folder di mana
PCMAV Cleaner/RTP berada.
2. Prosedur penginstalan database virus ClamAV
A. Download dengan menggunakan download manager file database
harian dari alamat berikut ini:
http://db.local.clamav.net/daily.cvd
CATATAN: Jika dengan cara penunjukan langsung alamat seperti
di atas browser Anda gagal men-download kedua file tersebut,
maka masuklah ke situs www.clamav.net, lalu tepat di bawah
judul "Latest releases" terdapat link "daily.cvd". Anda
tinggal meng-klik kanan link tiap file tersebut, lalu pilih
"Save As".
B. Tempatkan file "daily.cvd" tersebut beserta file "main.cvd"
yang terdapat di folder ClamAV pada CD/DVD majalah PC Media
edisi ini ke dalam folder di mana PCMAV Cleaner/RTP berada.
3. Setelah semua prosedur diatas dilakukan, pastikan bahwa pada
folder PCMAV telah terdapat 6 (enam) buah file, yaitu:
1. PCMAV-CLN.exe ==> dari paket PCMAV di CD/DVD PC Media
2. PCMAV-RTP.exe ==> dari paket PCMAV di CD/DVD PC Media
3. README.TXT ==> dari paket PCMAV di CD/DVD PC Media
4. libpclamav.dll ==> hasil download
5. main.cvd ==> dari paket ClamAV di CD/DVD PC Media
6. daily.cvd ==> hasil download
Sekarang Anda jalankan PCMAV-CLN.EXE, apabila ClamAV tersebut
berhasil diintegrasikan oleh PCMAV maka akan tampil informasi
mengenai database ClamAV pada kolom "PCMAV Informations". Dan
Anda sekarang dapat menggunakan PCMAV seperti biasa (termasuk
RTP), tentunya dengan database virus yang lebih banyak.
Sumber : "README" PCMAV RC22 RTP+CLN
Labels: Pengalaman
Karena tidak semua daerah bisa ditampilkan secara rinci di Google Maps, maka salah satu caranya adalah kita membuat pemetaan masing-masing wilayah kita, sehingga makin lama akan semakin banyak daerah di Indonesia yang memiliki keterangan secara rinci tentang potensi yang dimilikinya.
Salah satu cara untuk membuat pemetaan dan rute di Google Maps adalah dengan membuat peta secara online di Wayfaring[dot]com.
Berikut ini salah satu contohnya, hasil penitikan di www[dot]wayfaring[dot]com :
Labels: Pengalaman

File Virtual Desktop Manager bisa diunduh disini :
Virtual Desktop Manager
Labels: Pengalaman
A program for drawing structured diagrams.
Bila melihat pada library atau sheets yang terdapat pada Dia 0.96.1, maka software ini salah satu yang cocok untuk Siswa TKJ atau Mahasiswa D3TKJ juga proli TIK lain, dimana beberapa sheetsnya berisi (digunakan untuk membuat diagram atau perangcangan suatu proyek) :
1. Cisco - Computer
2. Cisco - Misc
3. Cisco - Network
4. Cisco - Switch
5. Cisco - Telephony
6. Network
7. dll
Sebagai gambarannya adalah :
Dia is a gtk+ based diagram creation program released under the GPL license.
Dia is inspired by the commercial Windows program 'Visio', though more geared towards informal diagrams for casual use. It can be used to draw many different kinds of diagrams. It currently has special objects to help draw entity relationship diagrams, UML diagrams, flowcharts, network diagrams, and many other diagrams. It is also possible to add support for new shapes by writing simple XML files, using a subset of SVG to draw the shape.
It can load and save diagrams to a custom XML format (gzipped by default, to save space), can export diagrams to a number of formats, including EPS, SVG, XFIG, WMF and PNG, and can print diagrams (including ones that span multiple pages).
Untuk melihat contohnya bisa lihat di :
http://www.gnome.org/projects/dia/
Semoga bermanfaat.
Labels: Pengalaman, Ubuntu
An integrated calendar application for Thunderbird
Works with:
* Thunderbird Thunderbird: 1.5 – 2.0.0.*
How to Install in Thunderbird
1. Right-click the link below and choose "Save Link As..." to download and save the file to your hard disk.
2. In Mozilla Thunderbird, open Add-ons from the Tools menu.
3. Click the Install button, and locate/select the file you downloaded and click "OK".
Install Now (Linux)
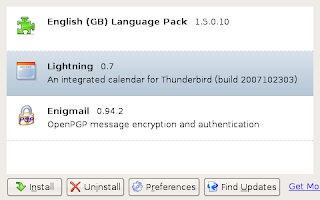
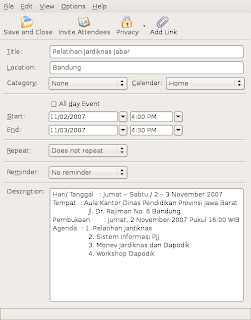
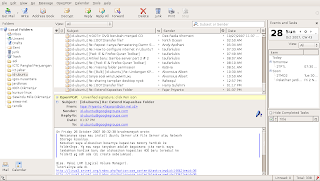
Example Event on My Ubuntu Thunderbird with MyEvent :
Labels: Pengalaman
Product Advisory: Nokia BL-5C battery
Dear Nokia Customer,
This is a product advisory for the Nokia-branded BL-5C battery manufactured by Matsushita Battery Industrial Co. Ltd. of Japan between December 2005 and November 2006. This product advisory does not apply to any other Nokia battery.
Nokia has identified that in very rare cases the affected batteries could potentially experience over heating initiated by a short circuit while charging, causing the battery to dislodge. Nokia is working closely with relevant local authorities to investigate this situation.
Nokia has several suppliers for BL-5C batteries that have collectively produced more than 300 million BL-5C batteries. This advisory applies only to the 46 million batteries manufactured by Matsushita between December 2005 and November 2006. There have been approximately 100 incidents of over heating reported globally. No serious injuries or property damage have been reported.
Consumers with a BL-5C battery subject to this advisory should note that all of the approximately 100 incidents have occurred while charging the battery. According to Nokia's knowledge this issue does not affect any other use of the mobile device. Concerned consumers may want to monitor a mobile device while charging that contains a BL-5C battery subject to this product advisory.
While the occurence in the BL-5C batteries produced by Matsushita in the time-period specified is very rare, for consumers wishing to do so, Nokia and Matsushita offer to replace for free any BL-5C battery subject to this product advisory.
The BL-5C batteries which are subject to the product advisory were used with the following Nokia models or separately as accessories:
Nokia 1100, Nokia 1100c, Nokia 1101, Nokia 1108, Nokia 1110, Nokia 1112, Nokia 1255, Nokia 1315, Nokia 1600, Nokia 2112, Nokia 2118, Nokia 2255, Nokia 2272, Nokia 2275, Nokia 2300, Nokia 2300c, Nokia 2310, Nokia 2355, Nokia 2600, Nokia 2610, Nokia 2610b, Nokia 2626, Nokia 3100, Nokia 3105, Nokia 3120, Nokia 3125, Nokia 6030, Nokia 6085, Nokia 6086, Nokia 6108, Nokia 6175i, Nokia 6178i, Nokia 6230, Nokia 6230i, Nokia 6270, Nokia 6600, Nokia 6620, Nokia 6630, Nokia 6631, Nokia 6670, Nokia 6680, Nokia 6681, Nokia 6682, Nokia 6820, Nokia 6822, Nokia 7610, Nokia N70, Nokia N71, Nokia N72, Nokia N91, Nokia E50, Nokia E60
This product advisory applies also to the following accessories:
Nokia Wireless GPS Module LD-1W,
Nokia Wireless GPS Module LD-3W
“Nokia” and “BL-5C” are printed on the front of the battery. On the back of the battery, the Nokia mark appears at the top, and the battery identification number (consisting of 26 characters) is found at the bottom. If the battery identification number does not contain 26 characters, it is not subject to this product advisory.
ENTER THE 26-CHARACTER PRODUCT IDENTIFICATION NUMBER to form in website :
http://batteryreplacement.nokia.com/batteryreplacement/en/
I hope your battery is safe and not require to be replaced.
(Report from : http://batteryreplacement.nokia.com/batteryreplacement/en/)
Persyaratan untuk instalasi UbuntuME :
1. Terkoneksi ke Internet ;-)
2. Memiliki script install-ubuntuME.sh
Cara instalasi UbuntuME ini adalah untuk Ubuntu Feisty (7.04), Edgy (6.10) or Dapper (6.06) yang akan diubah ke Ubuntu Muslim Edition. Adapun caranya adalah :
1. Download script install-ubuntuME.sh disini;
2. Pada Terminal, berikan perintah ini chmod u+x install-ubuntuME.sh
;
3. Jalankan script UbuntuME dengan cara : sudo ./install-ubuntuME.sh
4. Ikutilah tahapannya, karena nanti akan juga ditanya ttg accept the Java license and Zekr Quran translations.
Selamat menikmati UbuntuME (SHM = SiHijauMenawan) ;-)
Labels: Ubuntu
To install dokeos, click on Click to INSTALL DOKEOS button. If you need some instructions for installation dokeos, please click on the link read the installation guide.
 Step 1
 Installation Language. Please select the language you'd like to use when installing. This is language for the installation instructions what you want.
Step 2
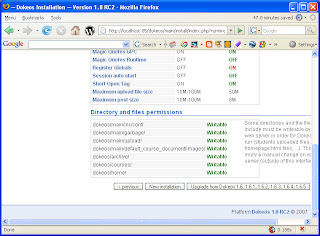
Server requirements. The image below show the error information for server requirements cause i'm use PHP Version 4.4.4 and not use LDAP extension, but don't worry about it.
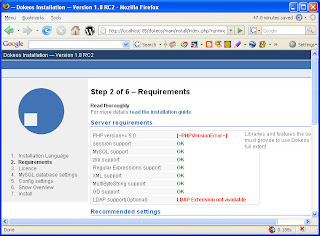 On the button below you can choose one from two button for the method of installation dokeos. New installation button can you select if you install dokeos for the first time on your system, but if you want to upgrade dokeos from the release before 1.8, you must choose the Upgrade from Dokeos 1.6, 1.6.1, 1.6.2, 1.6.3, 1.6.4, 1.6.5 button.
 Step 3
 Licence aggrement. Dokeos is free software distributed under the GNU General Public Licence (GPL). Read the licence aggrement and click on the I Accept button for continue the installation dokeos.
Step 4MySQL database settings. Please fill the form below according to the your MySQL Server configurations. Click Check database connection button for check your configuration, if the check-list image like picture below (check-list image with green color), so your configuration are true and the installation can continue to the next step.
Step 5
Config settings. Fill the form, of course not same like below, like i'm show on the image. Insert your identity and URL of your organisation to the form. Your information will be save in file configuration.php and will located on main/inc/ folder. Click Next button to continue the installation.
Step 6
Last check before install. Please save your configuration before you continue to the next step. Click Install Dokeos button to begin install dokeos on your system.
Last Step
Config settings. If you see the window like image below, the installation your dokeos is done! Congratulation! So, you can now click on link Go to your newly created portal.

After you click the link Go to your newly created portal, browser will be show your portal like below. And then you can login with your username and password. Let's Party with your new portal for elearning. ;-)
Labels: Dokeos
Dokeos : Elearning and Course Management Web App
26 comments Posted by Sebuah Pengalaman Hidup at 12:34 AMAbout Dokeos
Dokeos is an elearning and course management web application,
and is free software (GNU GPL). It's translated into 30 languages,
SCORM compliant, and light and flexible.
Dokeos supports many different kinds of learning and collaboration activities.
Teachers/trainers can create, manage and publish their courses through the web.
Students/trainees can follow courses, read content or participate actively
through groups, forums, chat.
Technically, Dokeos is a web application written in PHP that stores data in a
MySQL database. Users access it using a web browser.
If you would like to know more or help develop this software, please visit
our homepage at http://www.dokeos.com
Portability
Dokeos is an AMP software. This means it should work on any platform running Apache
+ MySQL + PHP. It is then supposed to work on the following Operating Systems :
* Linux
* Windows (98, Me, NT4, 2000, XP)
* Unix
* Mac OS X
It has been tested on
* Fedora, Mandrake, Red Hat Enterprise Server, Ubuntu, Debian
* Windows XP, Windows 2000
* Mac OS X 10.3
Email functions remain silent on systems where there is no mail sending software
(Sendmail, Postfix, Hamster...), which is the case by default on a Windows machine.
Contents
1. Requirements
2. Installing a new version of Dokeos
1. Requirements As from Dokeos 1.8 additional plugins can be enabled. Two of these plug-ins needs a set of prerequirements and additional installation of software modules. The basic requirements have to be met by the core or basic Dokeos modules. Both additional plugins do need a jdk (java development environment). The additional packages may be installed on an other computer as the DokeosServer. * Basic requirements 1.1 Basic Requirements Dokeos is a web application which requires some other software to function: * A web server - we recommend Apache These software packages have to be installed on the computer where you will install Dokeos. The Apache web server is recommended, and Dokeos is configured to use some Apache security enhancements if possible. However, other web servers will work too. For best security results, you need to have the Apache module mod_rewrite activated. The mod_rewrite rules for Dokeos are read from a .htaccess file in the courses folder, so Apache needs to allow this (AllowOverride FileInfo in httpd.conf). 1.1.2. PHP You need PHP version 4.3.2 or later (4.x versions), configured with the following modules : mysql, zlib, preg, xml. PHP versions 5 or later are not supported by Dokes yet. You need the ldap module too if you want to use ldap with Dokeos. Most of the PHP4 compiled distributions are provided with these modules. Anyway, their presence is checked by the Dokeos install script. Some users could meet problems if their PHP setting doesn't fit these ones: * short_open_tag = On Past Dokeos versions required register_globals to be set to On. This is no longer necessary, this can be set to Off and Dokeos will work fine. BSD users: these php libraries have to be included during php installation: * php-mysql The mysql shared extension for php 1.1.3. The MySQL database server You will need a login and password allowing to administrate and create at least one database. By default, Dokeos will create a new database for each course created. It means your host should allow you to create and administrate several databases. You can also install DOkeos using only one database, in that case you have to select this option during the installation. Note: Furthermore, Dokeos needs to have write access to specific directories. The best way to deal with these permission is to give the webserver user read/ write access on the specified directories. The other directories can work with read access. The specific directories are listed in the installation section. or unzipped to. On a Windows machine locally, this is not a problem. Remotely, you need to be allowed to CHMOD through FTP, telnet or any means. Install a java jdk on the system where you will install the conversiontool and the videoconferencing modules. Depending on the system this environment have to be installed For the basic conversion of a presentation to Dokeos on neede the installation of openoffice.org. Download openoffice.org and install Once the latest version of OpenOffice.org is installed, edit the configuration file (Setup.xcu) and add the following property : (ex on Debian /usr/lib/openoffice/share/registry/data/org/openoffice/Setup.xcu) For the basic convertion of a presentation to Dokeos one need to run the openoffice server in headless mode. On linux systems this is done via the X framebuffer (xvfb package). When your server does not contain an x-window system, additional fonts and basic x-window libraries have to be installed for not running into problems. If during the conversion sets one need additional recording of sound, then the installation of the Openlaszlo and tomcat modulesare needed. The startup from the Openoffice server at startup from the computer van be done via the file oooserver.init. Additional description is found on the Dokeos wikihttp://www.dokeos.com/wiki/index.php/MakeOOOListening Configuration in dokeos platform admin, Configure the services, Configure PowerPoint2LearningPath * host:localhost 1.4 Requirements for VideoConferencing The set-up and usage of the videoconferencing and recording functionality in Dokeos is provided by patched external packages. These patches are at this moment not yet available in the latest stable release of the packages. The following 4 packages are used. Openlaszlo comes in a packages with the tomcat server 5.0.24. The red5 streaming servers is packaged with the jetty servlet engine. In order to be able to correctly identify the usercontext from Dokeos into Openlaszlo and Red5 the connection between the apache webserver and the tomcat servlet engine is needed. * OpenLaszlo: http://www.openlaszlo.org/ Download of the additional packages from the Dokeos site. * The packages Openlaszlo and tomcat can be downloaded at http://www.dokeos.com/download/... dokeosopenlaszlo_1_8.tar.gz 1.4.1 Requirements and installation of OpenLaszlo Depending if the Openlaszlo server is installed on the same server as the webserver of dokeos, different parameters have to be changed * Installation of the Openlaszlo server tar -xzvf dokeosopenlaszlo_1_8.tar.gz 1.4.2 Requirements and installation of Red5 Server Installation and set-up of the Red5 Server * Installation tar -xzvf dokeosred5_1_8.tar.gz 1.4.3 Requirements for the connection of Tomcat with Apache The mod-jk or mod-jk module for apache(2) has to be installed in order to transfer the sessiondata from the Dokeos to the additional plugins. For the installation of the additional modules see the installation guide of the webserver. * Apache2 with mod-jk module 1.4.4 Configuration of DokeosVideoServerving plugin The configuration of the videoServing is done via de admin pages of Dokeos Configuration in dokeos platform admin, Configure the services, Configure VideoConferencingServer This contains the URL to the videoserver the example is for a localversion * url:/lps-latest/videoconferencing/videoconferencing.html Bandwidth calculation Outgoing Stream:7KB Incoming Stream: 12KB 1 one2four VideoConference: 4 outgoing streams from every client: 4*7KB=28KB incoming traffic on server-side 12 incoming streams to every client: 12*12KB=144KB outgoing traffic from server-side 1 one2many Conference (up to 50 seats) 1 outgoing streams -> 7KB incoming traffic 50 incoming streams -> 50*12KB = 524KB outgoing traffic 2. Installing a new version of Dokeos 2.1. Download the Dokeos 1.8 install package (.zip for Windows users or .tar.gz for all others) from the Dokeos download page. 2.2. Unzip or untar the downloaded install package. Most current operating systems can do this with a built-in graphical application, if this doesn't work you can open a commandline, go to the download directory and type tar -zxvf dokeos-community-1.8.tar.gz 2.3. Move by any means (FTP, SCP, local file copy) the contents of the Dokeos install package to your website on your webserver (whether webroot or subdirectory). Your webserver can also be your local computer. Be sure to copy all the folders (archive, home, claroline, courses) as well as all the .php files. For Windows users who install Dokeos locally: if you use an Apache/PHP/MySQL combination package, just drag and drop the contents of the Dokeos install package into the web directory of the combination package: * EasyPHP - C:\Program Files\easyphp\www\ 2.4. The following directories need to be readable, writeable and executable for the owner of the apache webservice: * dokeos/main/inc/conf/ On Linux, Mac OS X and BSD operating systems you can use the CHMOD 777 command for this. In Windows, you may need to check the properties of the folders (by right-clicking on them). 2.5. The following files need to be readable and writeable for everyone: * dokeos/main/inc/conf/configuration.php (if present) On Linux, Mac OS X and BSD operating systems you can use the CHMOD 666 command for this. In Windows, you may need to check the properties of the files and folders (by right-clicking on them). NOTE: 2.6. Open a web browser and go to http://www.yourserver.org/yoursite/dokeos/index.php If you install Dokeos locally (not on a server) open: http://localhost/dokeos/index.php
* Java requirements (only needed when adding convertions or videoconferencing
* Powerpoint and Presenter convertions to Learnpath
* Videoconferencing
* PHP
* The MySQL database server
You can install all these software packages separately, which often gives the best results. However, beginning users who want to test Dokeos can use a combination package that installs all these software packages in one simple install. If you want to use a combination package, we recommend Wamp (Download at the WAMP5 website, you also need the PHP4 add-on) or XAMP.
1.1.1. A web server
* safe_mode = Off
* magic_quotes_gpc = On
* magic_quotes_runtime = Off
* php-pcre The pcre shared extension for php
* php-session The session shared extension for php
* php-zlib The zlib shared extension for php
* php-xml
* (optional) php-ldap if you want to be able to use LDAP authentication
It seems the backticks characters (`) inserted inside most of the Dokeos SQL queries since version 1.3 don't work with MySQL versions before 3.23.6.
1.1.4. Permissions
1.2 Java Requirements
Download Java runtime environment and install
1.3 Requirements for Powerpoint and Presenter imports
* Username:
* Ftp password:
* Path to LZX Files:
When the openofficeserver runs on the same server as Dokeos. Host is localhost. Otherwise the remote parameters have to be entered. When a recording of audio is needed then the path to the lzx files is needed. When the openlaszlo server is installed on an other server the host has to be added otherwise./lps-latest/dokeos/videoconference/ppt2lprecorder.lzx
* Apache Tomcat: http://tomcat.apache.org/
* Red5: http://osflash.org/red5
* Jetty: http://www.mortbay.org/
* The Red5 packages can be downloaded at http://www.dokeos.com/download/... dokeosred5_1_8.tar.gz
* Check the path to the JAVA_HOME in $yourinst/lps-latest/Server/tomcat-5.0.24/bin/startup.bin(bat)
* If on a different server then the file should be edited $yourinst/lps-latest/Server/lps-latest/videoconference/videoconference.lzx (rmtphost should change to the host of dokeosserver, rmtphostlocal local tomcatserver)
* Start server with $yourinst/lps-latest/Server/tomcat-5.0.24/bin/startup.bin(bat)
* Check the path to the JAVA_HOME$yourinst/dist/red5.sh(bat)
* Start the server with $yourinst/dist/red5.sh(bat)
o Install mod-jk
o Configure the workers.properties file
+ edit file /etc/libapache2-mod-jk/workers.properties (ubuntu)
+ workers.java_home=/usr/lib/j2sdk1.5-sun (path to the java sdk)
+ workers.tomcat_home=$yourInstallation/lps-latest/Server/tomcat-5.0.24 (path to tomcat of Openlaszlo)
o Configure the file jk.load
+ edit file /etc/apache2/mods-enabled/jk.load (ubuntu)
+ JkLogFile /var/log/apache2/mod_jk.log
+ JkLogLevel info
+ JkLogStampFormat "[%a %b %d %H:%M:%S %Y]"
+ JkMount /lps-latest ajp13
+ JkMount /lps-latest/dokeos/* ajp13
o Restart/Reload Apache2
* Apache2 with mod-jk2 module
o Install mod-jk2
o copy a default workers2.properties to /etc/apache2/
o edit jk2.load remove comment lines
o Restart/reload Apache2
* WAMP - C:\Program Files\wamp\www\
* XAMP - C:\Program Files\xamp\www\
* dokeos/main/garbage/
* dokeos/main/upload/
* dokeos/main/img/default_courses_img/
* dokeos/archive/
* dokeos/courses/
* dokeos/home/
* dokeos/home/*.html
Do not modify the home_*.html files directly. Instead, choose "Configure the homepage" in the Dokeos administration section.
(Indonesia : HOWTO Memasang Aplikasi baru)
From eyeOS Wiki
This HOWTO will show you how to Install a new Application using eyeSoft.
(Indonesia : Dari eyeOS Wiki
HOWTO ini akan memperlihatkan bagaimana memasang Aplikasi baru memakai eyeSoft.)
Contents
(Indonesia : Daftar Isi)
- 1 Previous notes
- 2 Step by step HOWTO
- 2.1 Step 1
- 2.2 Step 2
- 2.3 Step 3
- 2.4 Step 4
- 2.5 Step 5
- 2.6 Step 6
(Indonesia :
1 Catatan awal
2 HOWTO Langkah demi langkah
- 2.1 Langkah 1
- 2.2 Langkah 2
- 2.3 Langkah 3
- 2.4 Langkah 4
- 2.5 Langkah 5
- 2.6 Langkah 6
)
Previous notes
(Indonesia : Catatan awal)
Você deve logar-se como root para abrir a aplicação de instalação do sistema.
(Indonesia : Tafsiran bebas :-) : Harus login sebagai root untuk melakukan pemasangan aplikasi pada sistem.)
Step by step HOWTO
(Indonesia : Langkah demi langkah HOWTO)
Step 1
(Indonesia : Langkah 1)
Open eyeBar and go to System preferences:
(Indonesia : Buka eyeBar dan klik System preferenses)
Step 2
(Indonesia : Langkah 2)
Go to the Admin tab, and click on Launch eyeSoft:
(Indonesia : Masuk ke tab Admin, dan klik pada Launch eyeSoft:)

Step 3
(Indonesia : Langkah 3)
Once eyeSoft is opened, click on Update to get the latest apps list from eyeOS central servers, and wait them to appear (it may take 20 or 30 seconds on small connections):(Indonesia : Bila eyeSoft telah terbuka, klik pada tombol Update untuk mengambil daftar aplikasi dari server pusat eyeOS, dan tunggu sampai aplikasi-aplikasi tersebut muncul (akan membutuhkan waktu 20 sampai 30 detik untuk koneksi yang kecil)):

After Update (Setelah Update)
Step 4
(Indonesia : Langkah 4)
Click on the app you want to install, and click on Install. Once the installer appears, click on Accept after checking the information of the app:(Indonesia : Klik pada aplikasi yang ingin Anda pasang, dan klik tombol Install. Bila installer muncul, klik tombol Accept setelah memeriksa informasi dari aplikasi tersebut:)

Step 5
(Indonesia : Langkah 5)
Wait for the app to be downloaded and installed:
(Indonesia : Tunggu sampai aplikasi selesai diunduh dan terpasang:)

Step 7
(Indonesia : Langkah 7)
You can launch the new installed app from Applications (in eyeBar) and from eyeLaunch, the app launcher:
(Indonesia : Anda dapat menjalankan aplikasi baru yang sudah terpasang dari Applications (dalam eyeBars) dan dari eyeLaunch, launcher aplikasi :)

Sumber dari : "http://wiki.eyeos.org/HOWTO_Install_a_new_Application"
Sebagai tambahan untuk Anda yang ingin menjalankan aplikasi ini di sistem operasi MS Windows, Anda dapat mengunduh "MicroServer".
Technorati : Aplikasi, Desktop, Web Based, eyeOS, opensource
Labels: eyeOS
- Browsing
- Blogging
- Upload Foto
- dll
Nanti dilanjutkan lagi yah, masih eksplorasi neh...
Blogged with Flock
Labels: Pengalaman
Sebuah Pengalaman Hidup ?????
Pengalaman Hidup seseorang akan sangat berbeda-beda, karena Allah SWT menciptakan manusia dengan karakter khusus yang sangat unik.
Kekayaan Zat dan Sifat Allah SWT, membuat segalanya mungkin terjadi. Tiada yang dapat menandingi-Nya dari sudut manapun juga.
Semua manusia yang hidup di dunia ini atas bimbingan, petunjuk dan arahan serta rahmat dan hidayat dari-Nya akan menghasilkan sesuatu yang bermanfaat bagi umat manusia umumnya dan diri sendiri khususnya.
Apa tujuan pembuatan blog saya ini? Ini adalah sebagian kecil ulasan pengalaman yang diperoleh dalam rangka memanfaatkan kemampuan yang diberikan oleh-Nya.
Sesuatu yang mungkin dapat berguna bagi diri sendiri atau orang lain yang menghadapi situasi yang sama, tetapi memiliki cara yang berbeda. Amin.


